Why Do We Realign Garage Door Sensors In Dallas Homes
Both automatic garage doors and manual garage doors are manufactured with sensors that are in built as prescribed by the law. Garage door sensors ensure that one can use the garage door safely. Normally, when they fail, the garage door will remain open and not move down.
Where garage door sensors are in alignment they allow the garage door to close smoothly. So here’s what we need to do if you garage door sensor is malfunctioning.
With kids in and out for basketball practice, endless strands of Christmas lights and cords, and the dog running in and out of the garage, your garage door sensors can get knocked around pretty easily. The good news is that they’re also easy to put back in place. We found a great step-by-step way to check and see if your garage door won’t close because of a sensor error.
First off, your sensors just may need cleaned off, so try to gently remove any dust or dirt first and see if that works. If that doesn’t work, it could be electrical. The sensors have to be aligned with each other and also have to be connected correctly to the garage door system in order to work. According to LiftMaster, issues with the safety sensor wiring typically occur because of a poor connection, incorrectly connected wires, or a short in the wire from a staple.
NOTE: If you are unable to get the door closed and the safety sensors are the issue, the garage door can be closed by pressing and holding the Door Control push bar until down travel is completed.
THE EASY TEST: If your garage door sensors are clean, it could be the alignment or the wiring. Here’s what LiftMaster suggests:
- Check for incorrect wiring between the sensors and the garage door opener.
- Verify the wire connections are correct on the garage door opener. The solid white wires connect (insert) to the white terminal, and the white/black wires connect to the grey terminal.
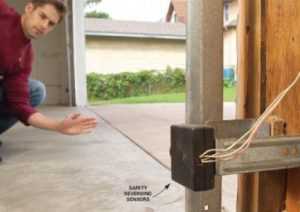
NOTE: The amber LED on the sending sensor will glow regardless of alignment or obstruction. If the green LED on the receiving sensor is off, dim, or flickering (and the invisible light beam path is not obstructed), alignment is required. See How do I align my safety reversing sensors?
THE HARD TEST: Feeling handy after that first test? If you still haven’t identified the problem or if you want to test the sensor wires themselves…
- Remove the sensors from the brackets.
- Remove the wires from the wire nuts or cut the sensor wires 12″ from the sensors.
- Strip both ends of wires from each sensor and twist like colored wires together. Proceed with both sensors to the garage door opener motor unit.
- Remove existing wires from the white and grey terminals on the back of the operator.
- Attach or insert white wires into the white terminal and black/white striped wires into the grey terminal.
- Point the sensors at each other – if both sensor LED’s turn on, there is an issue with your wiring. Replace the wires between the opener and the sensors. If the LED’s DO NOT turn on, replace the sensors.
As safety components, garage door sensors should then be looked after very carefully.
We should ensure that they in are in proper functionality and alignment. With the above information, we can now easily take care and maintain the sensors for complete safety and proper functioning of the garage door. If you found a problem in garage door sensor you can give our company a call at (214) 980-2015 to make sure that your garage door sensor is on the right alignment.
For More Related Articles: